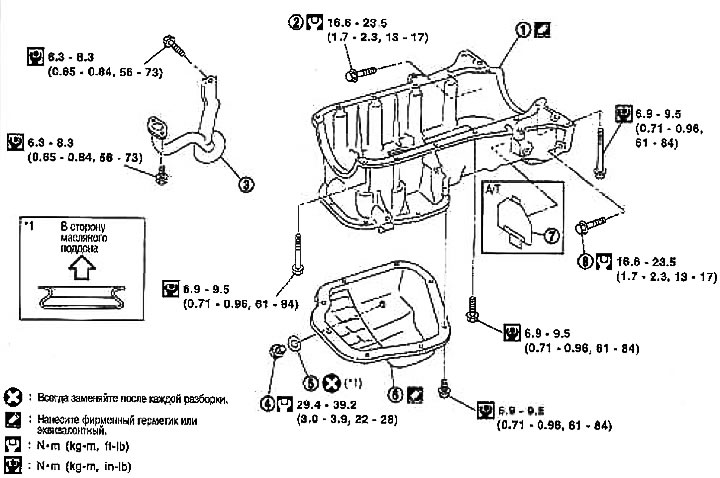
1. Oil pan (upper); 2. Transmission connecting bolt; 3. Coarse oil filter; 4. Drain plug; 5. Washer; 6. Oil pan (lower); 7. Back cover; 8. Transmission connecting bolt
Removing
Note: When removing and installing the oil pan (top) On vehicles with a manual gearbox, the gearbox must be removed.
1. Remove the protective pad from the front right fender.
2. Drain the engine oil.
3. Remove the oil pan (lower) in the following way:
- A. Loosen the bolts in the reverse order shown in the figure.
- b. Insert cutter (special tool) between the upper and lower oil pans. Move the cutter around the perimeter by tapping on its end with a hammer. Remove the oil pan (lower).
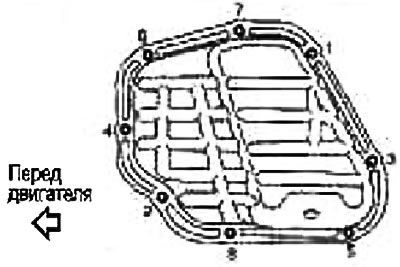
Attention: Do not damage the contact surfaces.
Oil pan removal procedure (top):
4. Remove the dipstick.
5. Remove drive belts. See above section «Drive belts».
6. Remove the air conditioning compressor together with the connected pipes and move it to the side.
Attention: To avoid stretching the tubes, hang it on a rope and temporarily secure it to the body.
7. Disconnect the front exhaust pipe. See chapter Accelerator, fuel system and exhaust system.
8. Remove the three-way catalytic converter support.
9. Remove a transmission as follows:
- A. Attach the engine lifting eyes to the cylinder head. See section below «Withdrawal».
- b. Raise with a winch and hang the engine.
- With. Remove the gearbox. See chapter Manual Transmission.
10. Remove the oil pan (upper) in the following way:
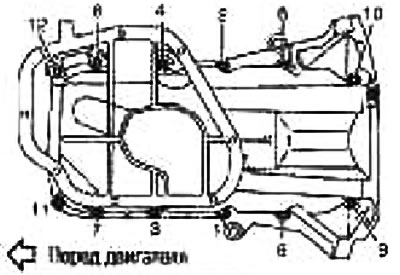
- A. Loosen the oil pan mounting bolts (top) in the reverse order shown in the figure.
- b. Insert a curved flat-bladed screwdriver into the slot (1), shown in the figure and create a gap between the oil pan and the cylinder block.
- With. Insert cutter (special tool) between the oil pan (top) and cylinder block. Move the cutter around the perimeter by tapping on its end with a hammer. Remove the oil pan (upper).
 | 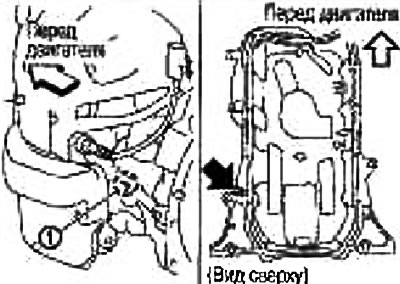 |
Attention: Do not damage the contact surfaces.
11. Remove the coarse oil filter.
Installation
1. Install an oil pre-filter.
Note: Do not install an o-ring, gasket or other sealing components.
2. Install the oil pan (upper) in the following way:
Apply sealant to the places shown in the picture.
Use branded sealant or equivalent.
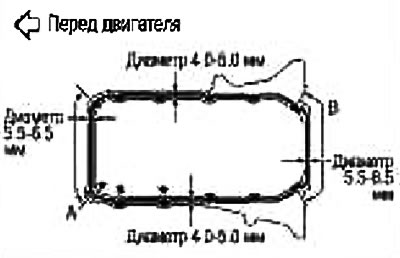
Caution: Apply sealant outside the bolt holes marked with ★ (3 places).
On the plots «A» And «IN» apply the sealant in a strip with a diameter of 5.5-6.5 mm.
Tighten the bolts in the order indicated by the numbers in the figure.
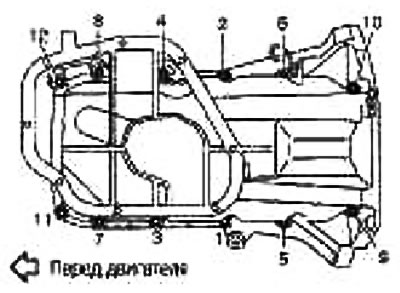
Note: Bolt locations are shown below:
- Shaft length under head 70 mm: 4, 8, 12
- Shaft length under head 90 mm: 9, 10
- Stem length under head 25 mm: other than above
3. Install the gearbox.
4. Install the oil pan (lower) in the following way:
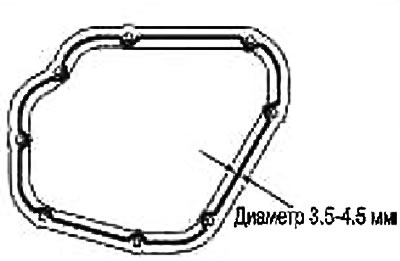
- A. Apply sealant to the places shown in the picture. Use branded sealant or equivalent.
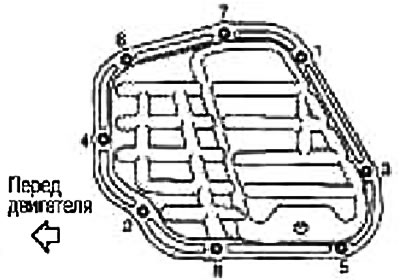
- b. Tighten the bolts in the order indicated by the numbers in the figure.
5. Screw the plug into the oil pan drain hole.
Refer to the component illustration above for the washer installation direction.
6. After this operation, installation is carried out in the reverse order of removal.
Caution: Fill engine oil at least 30 minutes after installing the oil pan.
Check after installation
Check the oil level. See chapter Lubrication system and engine cooling system.
Warm up the engine and check the engine oil level and for leaks. See chapter Lubrication system and engine cooling system.