Disassembly
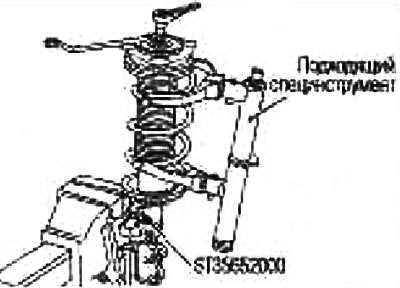
1. Install the nozzle (special tool) on the stand and secure it in a vise.

Caution: To prevent damage to the stand when installing the attachment, wrap the stand with a tissue.
2. Slightly loosen the piston rod jam nut.
Caution: Do not completely loosen the piston rod locknut. Otherwise, the spring will come off and cause serious injury.
3. Compress the spring with the tool (suitable special tool).
Caution: Make sure the spring compressor is securely hooked onto the spring before starting to compress the spring.
4. After making sure that the spring does not touch the upper and lower sockets after step 3, unscrew the piston rod jam nut.
5. Remove small components from the rack.
Remove the strut mount insulator and strut mount bearing. Remove the spring from the strut.
6. Remove the bump stop.
7. Gradually release the spring compressor (suitable special tool) and remove the spring.
Check after disassembly
Rack check
Check the upright for deformation, cracks or damage, and replace if necessary.
Check the piston rod for damage, uneven wear and distortion and replace if necessary.
Check for oil leaks at welded or sealing areas and change if necessary.
Checking the insulator and rubber parts
Check for cracks on the strut mount insulator and wear on the rubber parts. Replace if necessary.
Spring check
Check for cracks, wear and damage and replace if necessary.
Assembly
1. Compress the spring with the tool (suitable special tool) and install it on the stand.
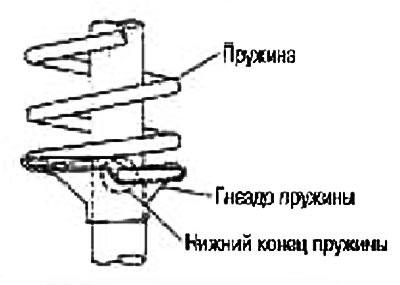
Caution: Install the spring with the smaller diameter side down (marked after 1.25 turns). Align the lower end with the spring seat as shown in the figure, the spring grips are securely hooked onto the spring, and begin to compress the spring.

Make sure the spring compressor is securely hooked onto the spring and begin to compress the spring.
2. Place a fender on the strut piston rod.
3. Install small components on the rack.
Install the strut mount insulator, strut mount bearing. Install the locknut on the piston rod.
Caution: Do not reuse the piston rod locknut.
4. Verify that the lettering on the rack mount insulator is positioned as shown.

5. Make sure the spring fits snugly into the strut mounting bearing. Gradually release the spring compressor.
6. Torque the piston rod jam nut.
Tightening torque: 67.5 Nm (6.9 kg m)
7. Remove the nozzle (special tool) from the rack (see fig.).
