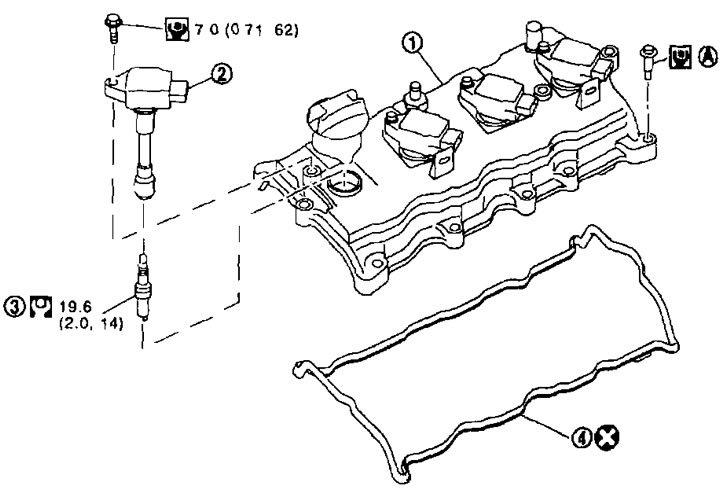
1. Valve cover; 2. Ignition coil; 3. Spark plug; 4. Valve cover gasket; A. See above
Removal and installation
Removal
1. Disconnect the air duct and resonator assembly. See above.
2. Remove the electric throttle actuator without disconnecting the water hose. See above.
3. Loosen the intake manifold mounting bolts and nuts.
4. Remove the intake manifold. See above.
5. Disconnect the connectors from the ignition coils.
6. Support the bottom of the engine with a telescopic stand.
7. Separate the ground cable and electrical wiring from the right engine mount bracket.
Remove the ignition coils
Attention:
- Do not drop or hit ignition coils.
- Do not disassemble the ignition coils.
9. Disconnect the PCV hose from the valve cover.
10. Remove the right engine mount bracket. See below.
11. If necessary, remove the PCV valve and O-ring from the valve cover.
12. If necessary, remove the oil filler cap from the valve cover.
13. Loosen the bolts in the reverse order shown in the figure.

14. Remove the gasket from the valve cover.
15. Using a scraper, remove any remaining old sealant from the cylinder head and bracket (№1) camshafts.
Attention. When removing old sealant, be careful not to scratch or damage the contact surfaces.
Installation
1. Apply sealant to the areas shown in the picture (4 seats front and rear cylinder heads) as follows:
A. Guided by Fig. «a», apply sealant at the joint of the bracket (№1) camshafts and cylinder heads.
b. Guided by Fig. «b», apply sealant at an angle of 90°relative to Fig. «A».

Use branded sealant or equivalent.
Attention. Installation should be performed within 5 minutes after applying the sealant.
2. Install the gasket into the valve cover.
3. Install the valve cover.
- Check to see if the gasket has fallen out of the mounting groove in the valve cover.
4. Tighten the bolts in two passes in the order indicated by the numbers in the figure.

1st pass
2nd pass
5. After this operation, installation is performed in the reverse order of removal.