General information
| Engine | MR20DE | |
| Cylinder arrangement | 4, in a row | |
| Cylinder volume, cm³ | 1,997 | |
| Cylinder diameter and piston stroke, mm | 84,0 x 90,1 | |
| Valve location | Double overhead camshafts (DOHC) | |
| Cylinder operating order | 1-3 4 2 | |
| Number of piston rings | compression | 2 |
| oil scraper | 1 | |
| Compression ratio | 10,2 | |
| Compression pressure: kPa (kg/cm²) /250 rpm | Standard | 1390 (14,2) |
| Minimum | 1140 (11,6) | |
| Limit spread between cylinders | 100 (1,0) |
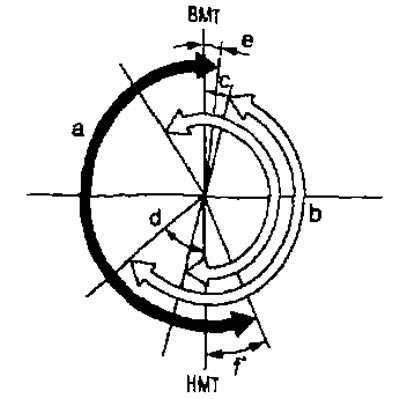
Valve timing (): Valve timing control mechanism in position «ON»
Unit of measurement, degrees.
| a | b | With | d | e | f |
| 220 | 232 | 13 (27) after TMT | 65 (25) after TMT | 7 | 33 |
Drive belt
| Drive belt tension | Adjusted automatically by automatic tensioner |
Spark plugs
| Manufacturer | NGK |
| Standard candle | PLZKAR6A 11 |
| Spark gap | 1 1 mm |
Exhaust manifold
| Parameter | Limit | |
| Surface warping | Individual holes | 0.3 mm |
| Collector as a whole | 0.7 mm | |
Camshafts
| Parameter | Standard | Limit | |
| Oil gap in camshaft journals | №1 | 0.045-0.086 mm | 0.15 mm |
| №2,3,3 5 | 0.030-0.071 mm | ||
| Camshaft bracket inner diameter | №1 | 28.000-28.021 mm | |
| №2,3,3 5 | 25,000-25,021 mm | ||
| Camshaft journal outer diameter | №1 | 27.935-27.955 mm | |
| №2,3,3 5 | 24.950-24.970 mm | ||
| Camshaft end play | 0.075-0.153 mm | 0.24 mm | |
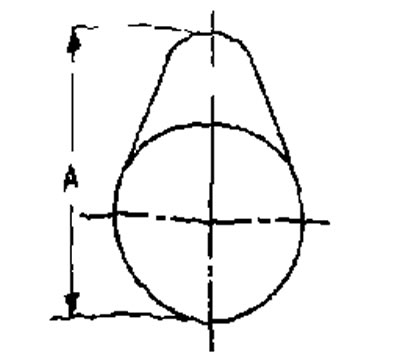
| Cam height «A» | Inlet | 45.265-45.455 mm | 45.065 mm |
| Issue | 43.775-43.965 mm | 43.575 mm | |
| Camshaft runout (maximum indicator reading) | Less than 0 02 | 0.05 mm | |
| Camshaft sprocket runout (maximum indicator reading) | 0.15 mm | ||
Valve tappets
| Parameter | Standard | |
| Pusher outer diameter | Inlet | 33.977-33.987 mm |
| Issue | 29.977-29.987 mm | |
| Pusher outer diameter | Inlet | 34,000-34,021 mm |
| Issue | 30,000-30,021 mm | |
| Valve tappet clearance | 0.013-0.044 mm | |
Valve clearances
| Parameter | Cold | On a hot engine* (std/ data) |
| Inlet | 0.26-0.34 mm | 0.304-0.416 mm |
| Issue | 0.29-0.37 mm | 0.308-0.432 mm |
*At a temperature of approx. 80°C
Cylinder head
| Parameter | Standard | Limit |
| Surface warping | Less than 0.03 mm | 0.1 mm |
| Nominal height «N» | 129.3-129.5 mm |
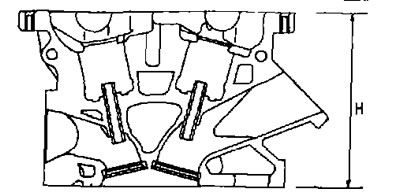
Valve sizes
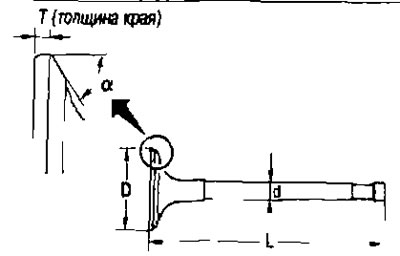
| Valve disc diameter «D» | Inlet | 33.8-34.1 mm |
| Issue | 27.6-27.9 mm | |
| Valve length «L» | Inlet | 106.27 mm |
| Issue | 105.26 mm | |
| Valve stem diameter «d» | Inlet | 5.465-5.480 mm |
| Issue | 5.455-5.470 mm | |
| Valve seat angle «A» | 45°15'-45°45’ | |
| Edge thickness «T» | Inlet | 1 1 mm |
| Issue | 1 2 mm | |
Valve guides
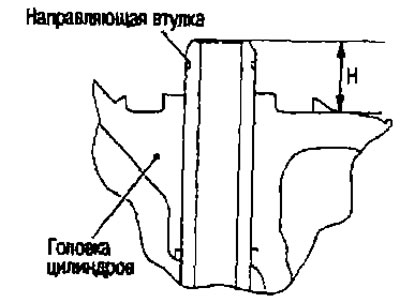
| Parameter | Standard size | Repair size increased by 0.2 | |
| Valve guide | O.D | 9.523-9.534 mm | 9.723-9.734 mm |
| Inner diameter (final) | 5,500-5,518 mm | ||
| Diameter of the hole for the valve guide sleeve of the cylinder head | 9.475-9.496 mm | 9.675-9.696 mm | |
| Press fit valve guide | 0.027-0.059 mm | ||
| Parameter | Standard size | Limit size | |
| Gap between valve stem and valve guide | Inlet | 0.020-0.053 mm | 0.1 mm |
| Issue | 0.030-0.063 mm | ||
| Elevation height «N» | 13.35-13.65 mm | ||
Valve seats
| Parameter | Standard size | Repair size increased by 0.5 | |
| Diameter of the seat recess in the cylinder head «D» | Inlet | 34.700-34.727 mm | 35.200-35.227 |
| Issue | 28.700-28.727 mm | 29.200-29.227 mm | |
| Valve seat outer diameter «d» | Inlet | 34.808-34.824 mm | 35.308-35.324 mm |
| Issue | 28.808-28.824 mm | 29.308-29.324 mm | |
| Press fit valve seat | 0.081-0.124 mm | ||
| Diameter «d1» *1 | Inlet | 31.8 mm | |
| Issue | 25.3 mm | ||
| Diameter «d2» *² | Inlet | 33.1-33.6 mm | |
| Issue | 26.9-27.4 mm | ||
| Corner «a1» | Inlet | 60° | |
| Issue | 45° | ||
| Corner «a2» | 88°45-90°15 | ||
| Corner «a3» | 120° | ||
| Valve seat flange width «W» *³ | Inlet | 1.0-1.4 mm | |
| Issue | 1.2-1.6 mm | ||
| Height «h» | Inlet | 5.9-6.0 mm | 5.03-5.13 mm |
| Issue | 4.95-5.05 mm | ||
| Depth «N» | Inlet | 8.04 mm | |
| Issue | 6.05 mm | ||
- *1: Diameter formed by the intersection point of the conical angles «a1» and «a2».
- *2: Diameter formed by the intersection point of the conical angles «a2» and «a3».
- *3: Dimensions for machining.
Valve springs
| Parameter | Standard | |
| Inlet | Issue | |
| Unloaded length | 46.18-46.68 mm | 45.67- 46.17 mm |
| Height after installation | 35.30 mm | 35.30 mm |
| Load after installation | 151-175 N (15.4-17.9 kg) | 140-162 N (14.3-16.5 kg) |
| Height with valve open | 25.70 mm | 26.88 mm |
| Load with valve open | 333-379 N (34.0-38 7 kg) | 283-323 N (28.9-32.9 kg) |
| Distinctive color coding | Green | Violet |
| Parameter | Limit |
| Valve spring squareness | 2.0 mm |
Cylinder block
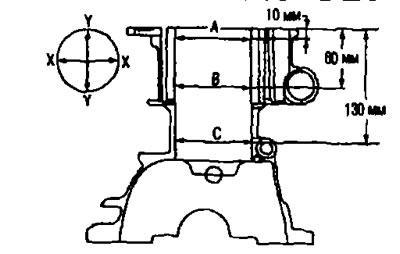
| Warping of the upper surface of the cylinder block | Limit | 0.1 mm | |
| Cylinder inner diameter | Standard | Class 1 | 84,000-84,010 mm |
| Class 2 | 84.010-84.020 mm | ||
| Ovality | Limit | 0.015 mm | |
| Taper | 0.010 mm | ||
| Class of the internal diameter of the main bearing housing in the cylinder block | Class A | 55.997-55.998 mm |
| Class B | 55.998-55.999 mm | |
| Class C | 55.999-56.000 mm | |
| Class D | 56,000-56,001 mm | |
| Class E | 56.001-56.002 mm | |
| Class F | 56.002-56.003 mm | |
| Class G | 56.003-56.004 mm | |
| Class H | 56.004-56.005 mm | |
| Class J | 56.005-56.006 mm | |
| Class K | 56.006-56.007 mm | |
| Class L | 56.007-56.008 mm | |
| Class M | 56,008-56,009 | |
| Class N | 56.009-56.010 mm | |
| Class P | 56.010-56.011 mm | |
| Class R | 56.011-56.012 mm | |
| Class S | 56.012-56.013 mm | |
| Class T | 56.013-56.014 mm | |
| Class U | 56.014-56.015 mm | |
| Class V | 56.015-56.016 mm | |
| Class W | 56.016-56.017 mm |
Pistons
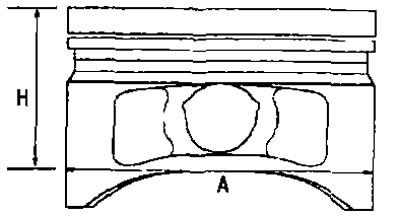
| Piston skirt diameter «A» | Standard | Class 1 | 83,980-83,990 mm |
| Class 2 | 83.970-83.980 mm | ||
| Measuring point «N» | 39.9 mm | ||
| Piston pin hole diameter | 19.993-19.999 mm | ||
| Gap between piston and cylinder wall | Standard | 0.020-0.040 mm | |
| Limit | 0.08 mm | ||
Piston rings
| Parameter | Standard | Limit | |
| Side clearance | Upper compression | 0.04-0.08 m | 0.11 mm |
| Second compression | 0.03-0.07 mm | 0.10 mm | |
| Oil scraper | 0.015-0.185 mm | ||
| Gap in the lock | Upper compression | 0.20-0.30 mm | 0.51 mm |
| Second compression | 0.50-0.65 mm | 0.83 mm | |
| Oil scraper (scraper) | 0.15-0.45 mm | 0.78 mm | |
Piston pins
| Parameter | Standard | Limit |
| Piston pin outer diameter | 19.989-19.995 mm | |
| Oil gap between piston and piston pin | 0.002-0.006 mm |
Connecting rods
| Distance between centers | 138.97-139.07 mm | |
| Bend (by 100) | Limit | 0.15 mm |
| Torsion (by 100) | Limit | 0.30 mm |
| Connecting rod small end bushing inner diameter | Standard | 20,000-20,012 mm |
| Oil clearance of the connecting rod small head bushing | Standard | 0.005-0.023 mm |
| Limit | 0.03 mm | |
| Connecting rod side clearance | Standard | 0.20-0.35 mm |
| Limit | 0.4 mm | |
| Connecting rod big end inner diameter | Class A | 47,000-47,001 mm |
| Class B | 47.001-47.002 mm | |
| Class C | 47.002-47,003 mm | |
| Class D | 47.003-47.004 mm | |
| Class E | 47.004-47.005 mm | |
| Class F | 47.005 47.006 mm | |
| Class G | 47.006-47.007 mm | |
| Class H | 47.007-47.008 mm | |
| Class J | 47.008-47.009 mm | |
| Class K | 47.009-47.010 mm | |
| Class L | 47.010-47.011 mm | |
| Class M | 47.011-47.012 mm | |
| Class N | 47.012-47.013 mm | |
*After installation in the connecting rod
Connecting rod bearing
Bearing class table
| Class | Thickness, mm | Color coding | Notes | |
| 0 | 1,494-1,497 | Black | The class and color of the upper and lower bearings are the same | |
| 1 | 1,497-1,500 | Brown | ||
| 2 | 1,500-1,503 | Green | ||
| 3 | 1,503-1,506 | Yellow | ||
| 4 | 1,506-1,509 | Blue | ||
| 01 | Upper | 1,494-1,497 | Black | The class and color of the upper and lower bearings are different |
| Lower | 1,497-1,500 | Brown | ||
| 12 | Upper | 1.497-1,500 | Brown | |
| Lower | 1,500-1,503 | Green | ||
| 23 | Upper | 1,500-1,503 | Green | |
| Lower | 1,503-1,506 | Yellow | ||
| 34 | Upper | 1,503-1,506 | Yellow | |
| Lower | 1,506-1,509 | Blue | ||
Table of bearings of reduced repair size
| Parameter | Thickness | Crankpin Diameter |
| Repair size reduced by 0.25 | 1.623-1.631 mm | Regrind the crankpin so that the oil clearance is within the specified range. |
Oil clearance of connecting rod bearings
| Oil clearance of connecting rod bearings | Standard | 0.037-0.047 mm |
| Limit | 0.07 mm |