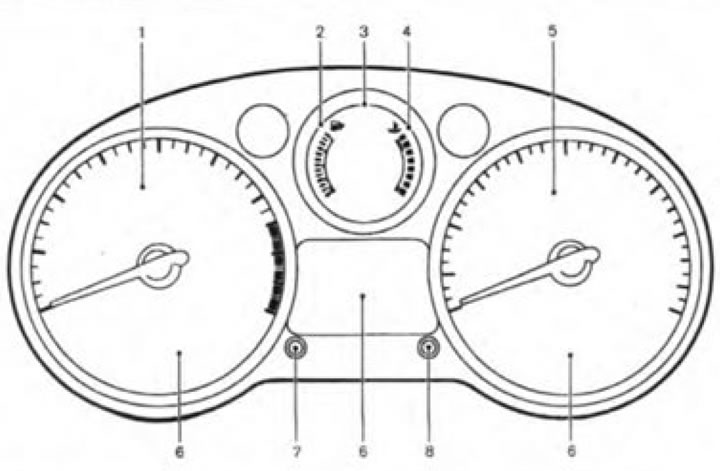
Measuring instruments and indicators: 1. Tachometer; 2. Fuel level indicator; 3. Liquid crystal display; - output of outside air temperature; - display of the position of the automatic transmission range selector lever*; - display of the position of the CVT selector lever; - displaying odometer/trip odometer readings for two trips; - output of on-board computer readings; - time display; - displaying information about the level and need to change engine oil*; 4. Engine coolant temperature gauge; 5. Speedometer; 6. Warning lamps and indicators; 7. Button for setting the clock; 8. On-board computer display switch; *if available.
Speedometer
The speedometer displays the speed of the vehicle.
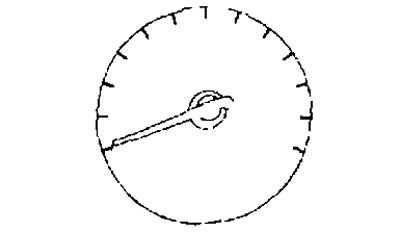
Tachometer

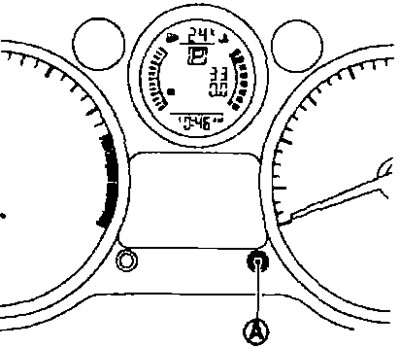
The tachometer displays the engine speed in rpm. Do not exceed critical engine speed when the tachometer needle moves into the red zone of the scale (A). The type and meaning of the red zone depend on the vehicle version.
Liquid crystal display
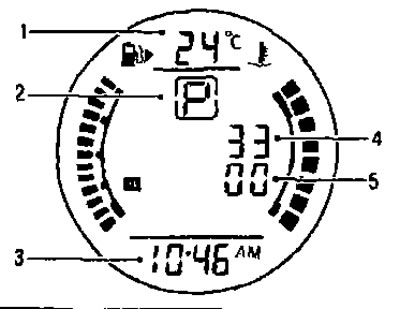
After turning on the ignition, the following information is displayed on the LCD screen:
- 1. Air temperature outside.
- 2. Position of the automatic transmission or CVT selector (for versions equipped with automatic transmission or CVT).
- 3. Time.
- 4. Odometer readings.
- 5. Odometer/on-board computer readings.
- The display screen can also display information about the level and condition of the engine oil (depending on configuration).
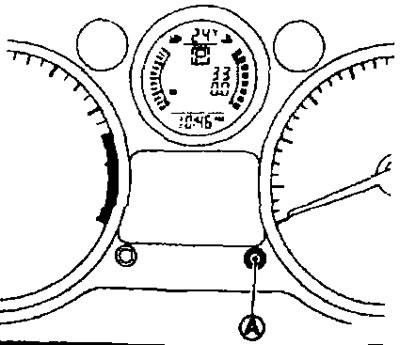
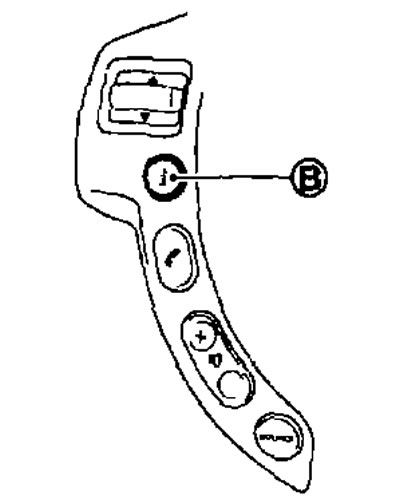
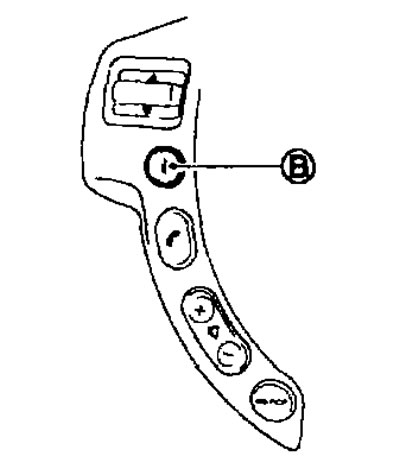
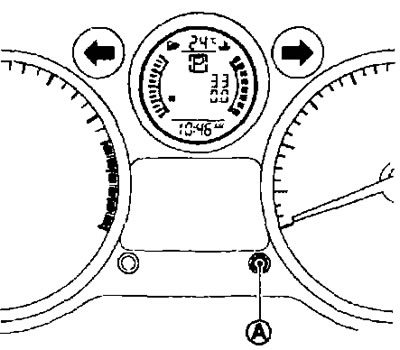
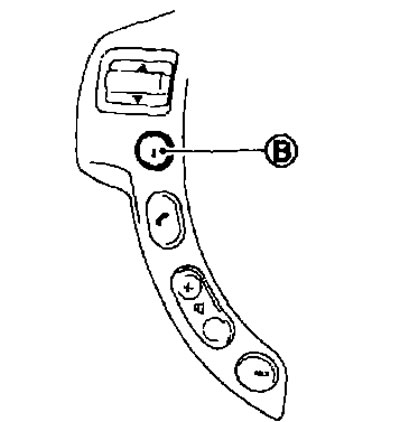
- To set or switch LCD display modes, you must press the button (A), located on the instrument panel. If available, you can use the button (IN) INFO located on the steering wheel.
Outdoor temperature indicator
The displays begin to flash if the outside air temperature does not exceed 3°C. The display will stop flashing after a minute or if the temperature is at least 4°C.
Automatic transmission selector lever position indicator
The indicator displays the current position in the automatic transmission after turning the ignition key to the ON position.
Selector lever position indicator for continuously variable automatic transmission (variator) (CVT)
The indicator displays the current position of the variator after turning the ignition key to the ON position.
On-board computer
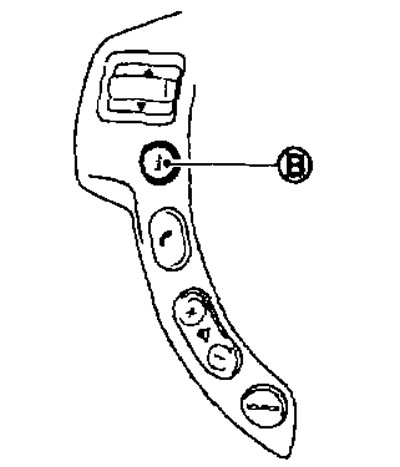
- After turning the ignition key to the ON position, you can select the operating mode by pressing the button (A) on-board computer or button (IN) on the steering wheel (if available),
- When you press the button successively (A) or (IN) The data display mode changes in the following order:
Trip A (Trip A) → Tier B (Trip B) → Distance to empty (Fuel range) → Average fuel consumption (Average fuel consumption) → Average speed (Average speed) → Elapsed time (Travel time) → Trip A (Trip A).
Fuel range (DTE KM)
- When displaying fuel range (dte) The approximate distance that you can travel with the amount of fuel remaining in the tank is indicated. Indicator «dte is calculated continuously taking into account the amount of fuel in the tank and the actual fuel consumption. The readings are updated every 30 seconds.
- There is a low fuel warning function: if there is little fuel left in the tank, the fuel range is automatically displayed on the display, with the message symbols flashing to attract the driver's attention. To return to the data display mode that was set before turning on the warning function, press the button (A) or INFO (IN) (if available).
- If you do not fill the fuel tank, then when the amount of fuel is further reduced, instead of indicating the power reserve, the symbols will light up on the display " _ _ _".
If a small amount of fuel was added during refueling, then immediately before turning off the ignition, fuel range readings can be displayed on the display screen.
When driving the vehicle on hilly or winding roads, the fuel tank overflows, which may temporarily affect the fuel range readings.
Average fuel consumption (L/100 KM)
Average fuel consumption is calculated for the period since the trip odometer was last reset. Reset readings by pressing and holding the button (A) or (NFO (IN) (if available) for more than 1 second. The readings are updated every 30 seconds. For approximately 500 m of travel after the reset, the symbols will appear on the display " _ _ _ _".
Average vehicle speed (KM/H)
The average driving speed is calculated for the period that has passed since the last reset of the meter. Reset readings by pressing and holding the button (A) or INFO (IN) (if available) for more than 1 second. The readings are updated every 30 seconds for the first 30 seconds after the readings are reset the display will show " _ _ _ _".
Travel time (H:MIN:S)
The travel time is counted for the period that has passed since the last reset of the readings; the readings are reset by pressing and holding the button (A) or INFO (IN) (if available) for more than 1 second.
Simultaneous display reset
To reset the display, press and hold the buttons (A) or INFO (IN) (if available) for more than 3 seconds. Average fuel consumption, average speed, travel time, and trip meter readings for one trip (TRIP B only) will be reset simultaneously.
Odometer
Odometer/trip meter for two trips
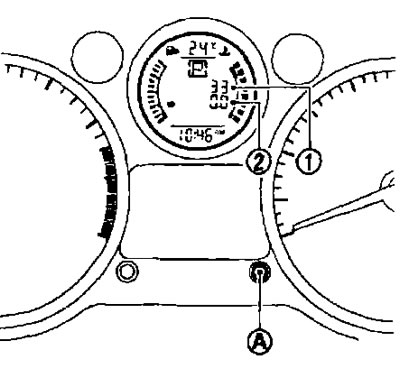
- The odometer and trip odometer readings for two trips appear when the ignition key is turned to the ON position.
- Odometer (1) shows the total mileage of the vehicle.
- The trip odometer shows the distance traveled for one of two trips.
Changing the trip odometer readings
When you press the mode switch button successively (A) or INFO (IN) (if available) Data display modes change in the following order:
Trip A (TRIP A) → Trip B (TRIP B) → On-board computer data display mode (Trip computer mode) → Trip A (TRIP A).
Resetting the trip odometer
- To reset the trip meter to zero, press the button (A) or INFO button (IN) (if available) and hold it for more than 1 second.
- To reset all trip computer readings except trip meter A (Trip A) and fuel range, press the button (A) or INFO button (IN) (if available) and hold it for more than 3 seconds.
Engine oil information
- When the ignition key is in the ON position, engine oil information will be displayed on the LCD in the following order → remaining mileage until oil change (with a wrench icon) → Engine oil level ("Oil Good" or "Oil Lo").
- Press the mode switch button (A) or INFO (IN) (the latter is located on the steering wheel, if equipped) and hold it for 5 seconds until the engine oil information is displayed on the screen after the text is displayed «Oil Good» Detailed graphical information about the engine oil level is displayed on the screen.

Setting the engine oil change interval
You can set the engine oil change interval or disable this option using the button (A) switching on-board computer modes.
- 1. Press the on-board computer button (A) and keep it pressed for more than 3 seconds while the display shows a wrench and shows the distance until the next engine oil change. When adjusting the span from zero (0). Press the on-board computer button (A) and keep it pressed for at least 3 seconds during the first 5 seconds after turning the ignition key to the ON position. The wrench icon and mileage will start flashing.
- 2. While the display is flashing, press the button (A) on-board computer again to enter setup mode. When setting the interval from zero (0): Press the button (A) on-board computer. The oil change interval will be set to default.
- 3. Turn the knob (A) on-board computer clockwise or counterclockwise to increase or decrease the interval value. Each turn increases or decreases the engine oil change interval by 1000 km. If no further action is taken, the display will switch to the engine oil level mode, which confirms that the new oil change interval has been successfully set.
Disabling the engine oil change reminder function
- 1. Press the on-board computer button (A) and hold it for more than 3 seconds while the display screen displays the image of the wrench and the mileage until the next engine oil change.
- 2. When the display starts flashing, press the button (A) on-board computer again to enter adjustment mode.
Fuel level indicator
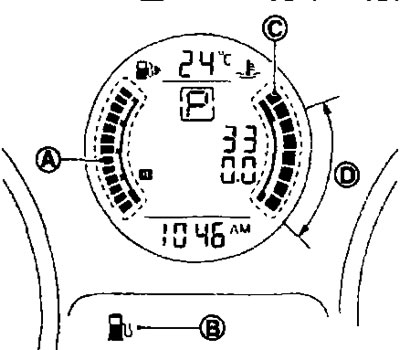
- This gauge shows the approximate fuel level in the fuel tank when the ignition is on.
- The readings may change slightly when braking, cornering, going uphill or downhill due to the movement of fuel inside the tank.
- Low fuel level warning lamp (IN) lights up when the fuel supply drops to a minimum. Fill the tank as soon as possible without waiting for the gauge needle to reach position E («Empty tank").
- The
 icon indicates the location of the fuel filler door (on the right side of the car).
 - When the indicator arrow reaches E («Empty tank») There is still a small reserve amount of fuel left in the fuel tank.
Engine coolant temperature gauge
Pointer (WITH) displays the engine coolant temperature. It should be within the normal operating range (D). The engine coolant temperature depends on the ambient temperature, vehicle conditions and driving mode.