Rear door assembly

Withdrawal. 1. Rear door assembly; 2. Rear door hinge; 3. Rear door pillar; 4. Rear door latch hinge; 5. Ball joint of the rear door pillar; 6. Rubber shock absorber; 7. Rubber shock absorber bracket; 8. Rear door lock assembly; 9. Emergency lever; 10. Rear door lock cover (right handle); 11. TORX bolt.
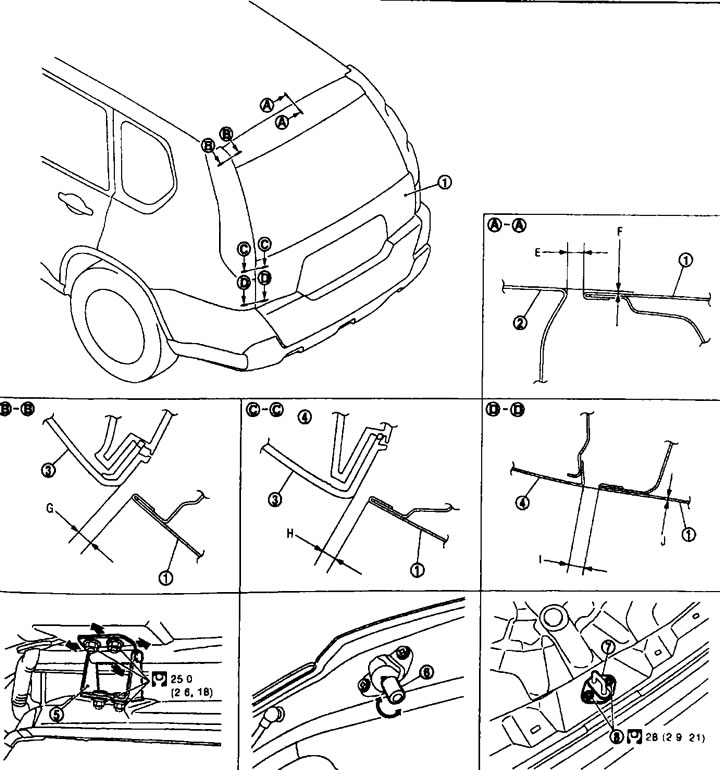
Adjustment. 1. Rear door; 2. Roof; 3. Rear combination lamp; 4. External side body panel; 5. Rear door hinge; 6. Rubber shock absorber; 7. Rear door latch hinge; 8. TORX bolt.
Removal and installation
Removal
1. Remove the rear door interior trim (top, bottom, side left). See section above «Interior equipment».
2. Disconnect the connectors in the rear door, remove the rubber bushing and electrical wiring.
3. Take out the rubber bushing, disconnect the connectors (1) and separate the washer tube (2) on site (A).

4. Remove the electrical wiring from the rear door.
5. Support the rear door lock with suitable material so that it does not fall (see fig.).
6. Unscrew the rear door pillar bracket mounting bolts.
7. Unscrew the hinge mounting nuts on the door side and remove the rear door assembly.
Attention. Carry out the work with a partner, because... the door is heavy.
Installation
Installation is carried out in the reverse order of removal.
Attention:
- After installation, check how the rear door closes/opens.
- After installation, check how the rear door locks/unlocks.
- After installation, adjust the fit. See below.

A. Jack; B. Napkin
Adjustment
| Plot | Standard (mm) | |||
| Rear Door Panel - Roof Panel | A-A | E | Gap | 5,0-7,0 |
| F | Height | from 0.3 to 1.7 | ||
| Rear door panel rear combination light | B-B | G | Gap | 4,0-8,0 |
| Rear Door Panel - Rear Combination Lamp | S-S | N | Gap | 4,0-8,0 |
| Rear door panel outer body panel | D-D | I | Gap | 5,0-7,0 |
| J | Height | from 1.0 to 1.1 | ||
Adjusting the fit
1. Check the clearance and surface height between the rear door and each component by sight and touch. (They must correspond to the standard sizes indicated in the table).
2. If any dimensions differ from the norm, adjust them as follows.
3. Loosen the rubber shock absorber.
4. Loosen the rear door latch hinge mounting bolts.
5. Raise the rear door approx. 100-150 mm, then close it slightly and make sure it fits tightly in the closed position.
6. Check clearance and surface height.
7. Tighten the latch hinge bolts to the required torque.
Rear Door Latch Hinge
Removal and installation
Removal
Unscrew the TORX bolts and remove the rear door latch hinge.
Installation
Installation is carried out in the reverse order of removal.
Attention:
- After installation, check how the rear door closes/opens.
- When removing and installing the rear door latch hinge, adjust the fit. See above.
Rear door hinge
See picture above.
Removal and installation
Removal
1. Remove the rear door assembly. See above.
2. Remove the rear door seal. See below.
3. Remove the lower side trim of the luggage compartment. See section above «Interior equipment».
4. Remove the upper side trim of the luggage compartment. See section above «Interior equipment».
5. Using a puller, remove the body side headliner clips at the rear of the headliner. See section above «Interior equipment».
6. Remove the back of the headliner.
7. Unscrew the hinge fastening nuts (from the body side) and remove the rear door hinges.
Installation
Installation is carried out in the reverse order of removal.
Attention:
- After installation, check how the rear door closes/opens.
- Check whether there is enough lubrication on the rotating part of the joint. Apply body lubricant if necessary.
- When removing and installing the rear door assembly, adjust the fit. See above.
- After installation, apply paint (to match the body color) on the hinge mounting nuts.
Rear door pillar
See picture above.
Removal and installation
Removal
1. Unscrew the mounting bolts (from the body side) and remove the rear door pillar bracket.
2. Remove the ball joint (from the rear door) and remove the rear door pillar.
Installation
Installation is carried out in the reverse order of removal.
Attention. After installation, check how the rear door closes/opens.
Rear door seal

Removal and installation
Removal
Pull the seal and disengage it from the body at the joint.
Attention. After removal, do not stretch the seal.
Installation
1. Starting from the top, align the mark on the seal with the mark on the center of the car and install the seal on the car.
2. On the lower section, align the seam of the seal with the center of the hinge behind the rear door slots.
3. After installation, lightly pull the seal and make sure there are no loose areas.
Note. Make sure the seal fits snugly at the corners and on the rear luggage compartment trim.