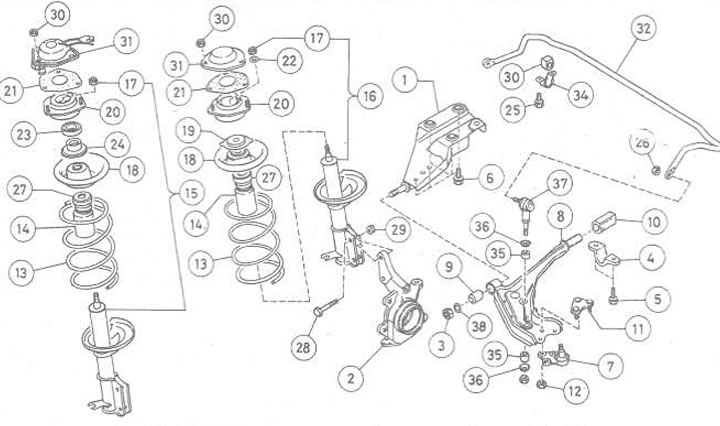
Pic. 10.14. Front suspension parts: 1. Suspension base plate; 2. Hub fastening element; 3. Nut; 4. Rear lower arm rotation clamp; 5. Clamp bolt; 6. Bolt; 7. Ball joint of the lower arm; 8. Lower suspension arm; 9. Front bushing for turning the lower arm; 10. Rear rotary bushing of the lower arm; 11. Lower arm ball joint mounting plate; 12. Nut; 13. Coil spring; 14. Anti-dust cap; 15. Adjustable damping suspension strut assembly; 16. Non-adjustable damping suspension strut assembly; 17. Strut piston rod nut; 18. Upper spring support; 19. Axial pressure support; 20. Upper rack mount; 21. Gasket (where available); 22. Washer; 23. Bearing; 24. Dust seal; 25. Clamp bolt; 26. Nut; 27. Rubber recoil buffer; 28. Clamp bolt; 29. Nut; 30. Nut of the upper rack fastening; 31. Top cover of the rack; 32. Anti-roll bar; 33. Rubber bushing; 34. Clamp; 35. Rubber bushing; 36. Belleville washer; 37. Backstage; 38. Puck
1. Remove the suspension strut and spring from the vehicle as described in previous Chapter. Clean the rack assembly completely.
2. Loosen, but do not completely unscrew, the piston rod nut.
3. Install the spring puller (Pic. 10.15), compress the spring until the upper strut mount is released.

Pic. 10.15. Compressing the spring before unscrewing the piston rod nut
4. Unscrew the piston rod nut, remove the washer (where available). Remove the top mount, bearing and dust seal or thrust mount, top spring mount. Remove the spring.
5. Visually inspect all rack components and replace any damaged or worn parts. Check the top mounting components. Check the spring for cracks, damage or excessive distortion. If either front suspension spring requires replacement, it is recommended to replace both front suspension springs.
6. Check the strut damping action by moving the piston rod all the way up and down; resistance should be felt in both directions. If the damping is weak or if the strut has oil leaks, if the piston rod is bent, loose or damaged, the strut should be replaced.
7. Assembly is carried out in reverse order. Retract the piston rod completely and check that the spring is properly compressed before installation. Place the spring and upper support as shown in Fig. 10.16 and 10.17, axial pressure support (or bearing and dust seal) must be correctly positioned on the piston rod and upper spring support. Tighten the piston rod nut to the torque specified in Specifications, remove the spring puller.

Pic. 10.16. Correct position of the front suspension coil spring

Pic. 10.17. Correct position of the upper front suspension spring support
8. Install the suspension strut and spring into the vehicle.