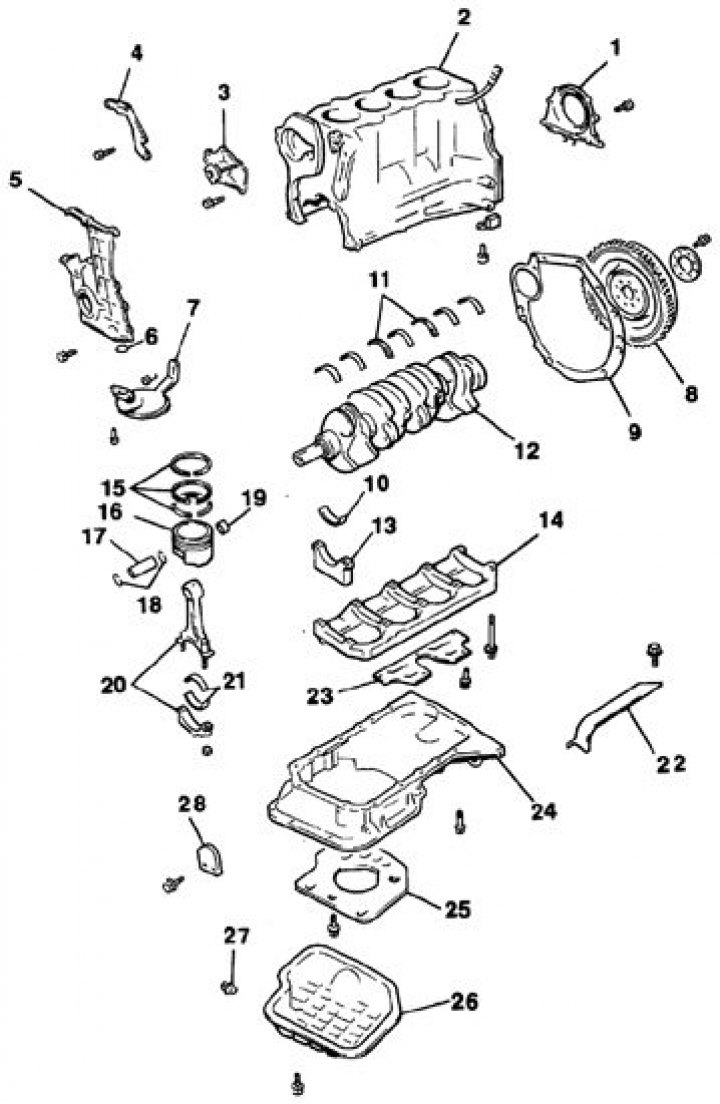
Cylinder block, crankshaft and connecting rod and piston group

1. Gland holder; 2. Cylinder block; 3. Coolant pump; 4. Generator bracket; 5. Timing chain cover; 6. O-ring; 7. Oil receiver with coarse filter; 8. Flywheel (torque converter drive plate); 9. Mounting plate; 10. Indigenous liners; 11. Thrust half rings; 12. Crankshaft; 13. Main bearing caps; 14. Frame of main bearing caps; 15. Piston rings; 16. Piston; 17. Piston pin; 18. Retaining rings; 19. Connecting rod head bushing; 20. Connecting rod and connecting rod cap; 21. Connecting rod bearings; 22, 23, 25. Oil deflector plate; 24. Aluminum pallet; 26. Steel pallet; 27. Drain plug; 28. Mounting plate
Disassembly order
It is easiest to disassemble the engine and perform all kinds of work on a portable stand, specially designed for engine repair. These stands can often be rented. Before mounting the engine on the stand, it is necessary to remove the flywheel with the clutch mechanism in order to screw the stand bolts into the cylinder block (crankcase).
If there is no stand, then you can disassemble the engine by strengthening it on a solid workbench or on the floor. When disassembling without using a stand, be very careful when handling the engine.
If you buy a ready-made rebuilt engine, then you first need to remove all attachments in order to install them later in exactly the same order as with an independent overhaul. These units include:
- generator, and power steering pump brackets and (or) air conditioner compressor (depending on vehicle configuration);
- ignition distributor, spark plugs and high-voltage wires;
- coolant pump and thermostat and radiator hoses;
- details of the carburetor or fuel injection system;
- all sensors and solenoid valves along with wiring;
- suction and exhaust manifolds;
- oil filter;
- fuel pump - for carburetor engines;
- engine suspension parts;
- flywheel/torque converter drive plate.
Attention! When removing attachments from the engine, pay special attention to those little things that can make it easier to assemble the engine. Mark gaskets, seals, spacers, pins, bolts, washers, nuts, etc. to ensure they are in their original position during reassembly.
If an incomplete cylinder block is installed (those. cylinder block with fitted and installed crank mechanism and piston group), you must also remove the cylinder head, oil pan, oil pump and camshaft timing chains.
If it is planned to carry out a major overhaul with complete disassembly, then the engine must be completely disassembled and the parts of the internal structure of the engine removed in the following order (unless otherwise noted, see subsection 3.1.1 and subsection 3.1.2.2.1).
- suction and exhaust manifolds;
- oil pan;
- camshaft drive chains with sprockets;
- cylinder head;
- flywheel;
- connecting rod and piston group;
- crankshaft.
Before disassembling and performing overhaul procedures, ensure that all necessary equipment and tools are available. A list of required tools is provided at the beginning of this manual.
Assembly order
Before starting assembly, prepare all the necessary new parts, gaskets and seals, as well as the necessary tools and fixtures. Read the description of the assembly procedures to get an idea of the scope of work ahead and to make sure you have everything you need. In addition to traditional tools and materials, you will also need a fixing compound for threaded connections. You will also need a liquid sealant to seal detachable joints in which gaskets are not provided. The manufacturer recommends the use of Genuine Liquid Gasket (available at Nissan Service Stations).
To save time and labor, assembly is recommended in the following order:
- crankshaft;
- pistons assembled with connecting rods;
- cylinder head and pushers;
- chain (chains) gas distribution mechanism;
- oil pan;
- flywheel;
- mounted units.
Before assembly, all parts must be thoroughly cleaned and dried, all defects must be eliminated. Details should be laid out on a completely clean desktop (or contain in individual packages).