Placement of elements of the heating preheating system
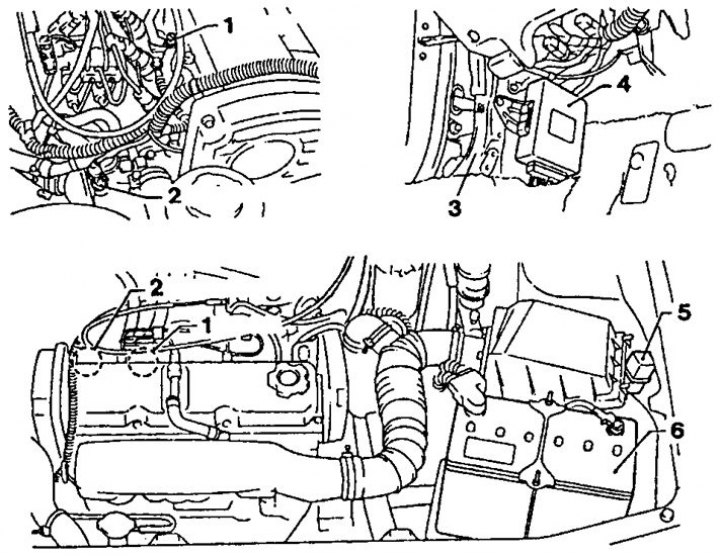
1. Glow plug; 2. Coolant temperature sensor; 3. Left front wall in the driver's footwell; 4. Glow timer; 5. Preheat relay; 6. Battery
Working principle of diesel engine
In a diesel engine, clean air is sucked into the cylinders and there it is subjected to a very high compression ratio. Due to this, the temperature in the cylinders rises above the ignition temperature of diesel fuel. Diesel fuel ignites on its own, so spark plugs are not required.
On a cold engine, the ignition temperature of the fuel cannot be reached by compression alone. In this case, heating (precanal) engine. To do this, in each vortex chamber of the engine there is a glow plug that heats up the combustion chamber.
The fuel is drawn directly from the fuel tank by the distribution injection pump. The injection pump generates the necessary high pressure (about 130 bar), which is distributed among the cylinders in accordance with the desired ignition sequence. At the same time, the injection pump regulator doses the fuel supply depending on the degree of engagement of the gas pedal. At a certain point in time, diesel fuel is injected through nozzles into the prechamber of the corresponding cylinder. Depending on the shape of the prechamber, or vortex chamber, the air sucked in under the influence of compression acquires a vortex motion, which contributes to optimal mixing of air and injected fuel.
Before entering the pump, the fuel passes through the fuel filter. There it is cleaned of dirt and water. Therefore, it is especially important to drain the water from the filter or replace it in accordance with the maintenance schedule.
The injection pump is maintenance free. All moving parts of the pump are lubricated with diesel fuel. The pump is driven from the crankshaft through a toothed belt, from which the camshaft is also driven.
Working according to the self-ignition scheme, the diesel engine cannot be switched off by removing the ignition voltage and has a solenoid valve for this. When the ignition switch is turned off, power is removed from the solenoid valve and it closes the fuel supply channel. This ensures that the fuel supply is interrupted before the steering wheel locks when the ignition key is removed. When the engine is started, voltage is applied through the ignition switch to the solenoid valve and it opens the fuel supply channel.
Preheat device
On a cold engine, the ignition temperature of the fuel cannot be reached by compression alone, so the engine must be warmed up. For this purpose, a core glow plug is screwed into each combustion chamber. A glow plug basically consists of a body and a heating rod pressed into it. As soon as voltage is applied, the filament coil in the heating rod heats up to a temperature of 850°C within a few seconds, so that the warm-up period before starting rarely lasts more than 10 seconds. After the preheat indicator lamp on the instrument panel goes out, the engine can be started. The duration of heating is regulated by an electronic control unit located in the passenger compartment next to the glove box on the right. The engine preheat control unit receives information about the engine temperature from the coolant temperature sensor. Based on the information received, the control unit determines the duration and magnitude of the preheat current.
Checking the pre-glow system
If you have difficulty starting the engine, you should first check the engine compression. If the compression pressure is too low, the engine will not start at low temperatures. If compression is good, check all glow plugs.
Verification conditions
The battery is fully charged, the battery voltage must be at least 12V. Engine cold (ambient temperature) or engine temperature is below +60°C. If the engine temperature is higher, disconnect the plug from the coolant temperature sensor.
Checking the current supply
This check can be made without removing the glow plugs.
1. Connect a voltmeter between the glow plug and ground.
2. Insert the key into the ignition lock and turn on the preheat. After 3 sec. battery voltage should appear (12V), otherwise check the lock switch contacts.
3. Then turn off the ignition and turn on the preheat. Measuring instrument in 20 sec. should show battery voltage (12V or higher). The time depends on the temperature of the glow plug, battery voltage, coolant temperature and the position of the ignition/starter switch between ON and OFF.
4. Disconnect the S terminal on the starter so that the starter cannot run.
5. Briefly turn the ignition key to "Start" and stop in position "Ignition ON". Voltmeter for 20 seconds should show the voltage of the battery (12V or higher).
6. Connect the S terminal to the starter.
7. Start the engine and let it idle. The voltmeter for 5 minutes should show the battery voltage (12V or higher), presumably the coolant temperature is below 60°C.
8. If there is no power supply, have the preglow system control unit checked by a workshop.
Checking the preheat control relay
1. Remove the relay.
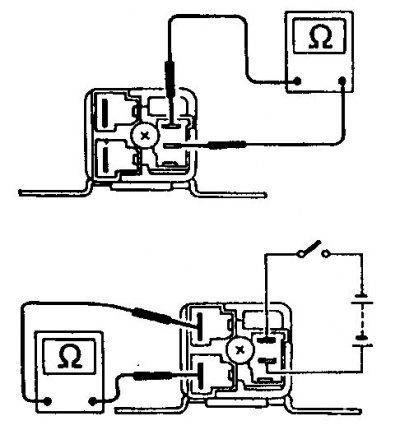
2. Check the relay coil with an ohmmeter for breakdown (0 ohm).
3. Connect an ohmmeter to the relay output. The connection must be present.
4. Apply battery voltage to the coil contacts. The relay should switch and the output resistance should be 0 ohms.
5. Otherwise, replace the relay.
Checking glow plugs
1. Check the current bar for rust, clean or replace if necessary.
2. Check the spark plug for external visible damage.
3. Disconnect the heater control plug. Connect an ohmmeter between terminal 5 of the plug and ground. Should be: 0 ohms, otherwise replace the wire.
4. Unscrew the connection cable and the glow plug conductor rail.
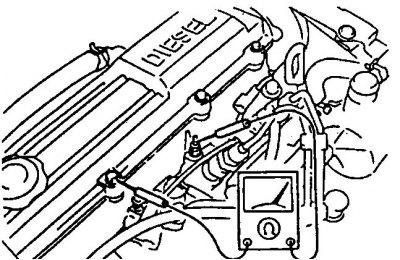
5. Use an ohmmeter to check the resistance between the glow plug terminal and the engine block (weight). Should be 0 ohm. If an open is found, replace the spark plug.
6. Thus, check all the candles.
Attention! The true resistance of a glow plug is very small and difficult to measure with conventional measuring instruments. Required value: 0.650 ohm. Before measurement, the candle should be cleaned of oil.
7. Remove the defective glow plug and replace.
8. Screw the connection cable and the current-carrying bar, having previously installed the spring and washer on the candle.
9. If disabled, connect the coolant temperature sensor plug.
Attention! If no fault is found, but the engine does not start well, the spark plugs should be inspected at the moment of glow. To do this, remove the nozzles and inspect the candles through the holes.
Glow plugs with burnt tips
10. Burnt spark plug tips are mostly the result of faulty injectors.
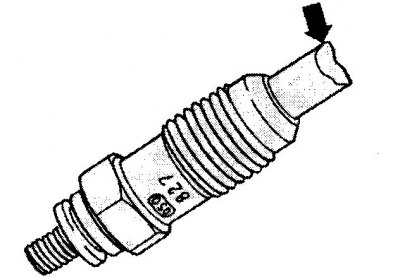
11. If such candles are found (arrow), just need to replace them.
12. Injectors should be checked for injection pressure and tightness (performed in the workshop).
Checking the coolant temperature sensor
1. Remove the temperature sensor.
2. Connect an ohmmeter to the sensor terminals and then either cool with a cooling spray or heat in a water bath to test.
Required values
| Temperature | Resistance |
| – 15°С | 11.5 kOhm |
| 0°C | 5.6 kOhm |
| + 10°C | 3.7 kOhm |
| + 40°C | 1.2 kOhm |
Checking the ignition switch contacts
1. Remove the bottom facing of a steering column.
2. Disconnect the ignition lock connector.
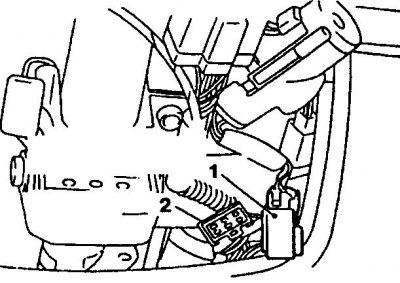
3. Connect to plug (1) ohmmeter and check the resistance (2 - plug to the ignition and starter switch). There must be no connection.
4. Insert the key into the ignition lock. The resistance must be less than 0 ohms, otherwise replace the ignition switch.
5. Establish the lower facing of a steering column.