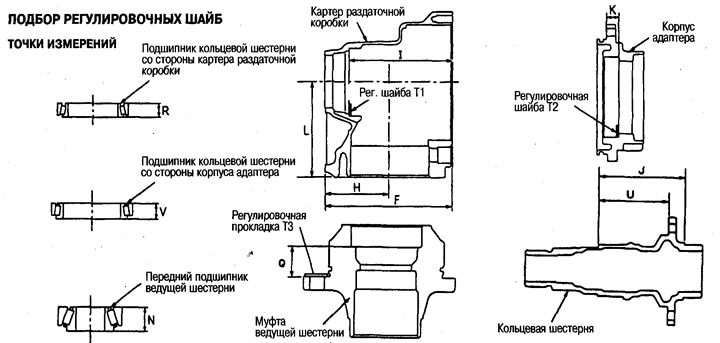
Adjusting washer of the bearing of the annular gear on the side of the transfer case housing
1. Measure dimensions F, H, I, R, U as shown in the figure.
2. Adjust dimensions F, H, I, R, U to the following values.
- F: 163.00 mm (with an accuracy of 0.01 mm)
- H: 83.00 mm (with an accuracy of 0.01 mm)
- I: 131.90 mm (with an accuracy of 0.01 mm)
- R: 17.00mm (with an accuracy of 0.01 mm)
- U: 89.50 mm (with an accuracy of 0.01 mm)
3. Check the Z dimension, which is marked on the side of the drive gear.
Note: The Z dimension is the difference between optimal and standard engagement with an accuracy of 0.01mm.
4. Calculate the required thickness of the ring gear bearing shim T1 on the transfer case side using the formula below.
- T1= (l-F+H+Z-U-R) x 0.01 + 1.49
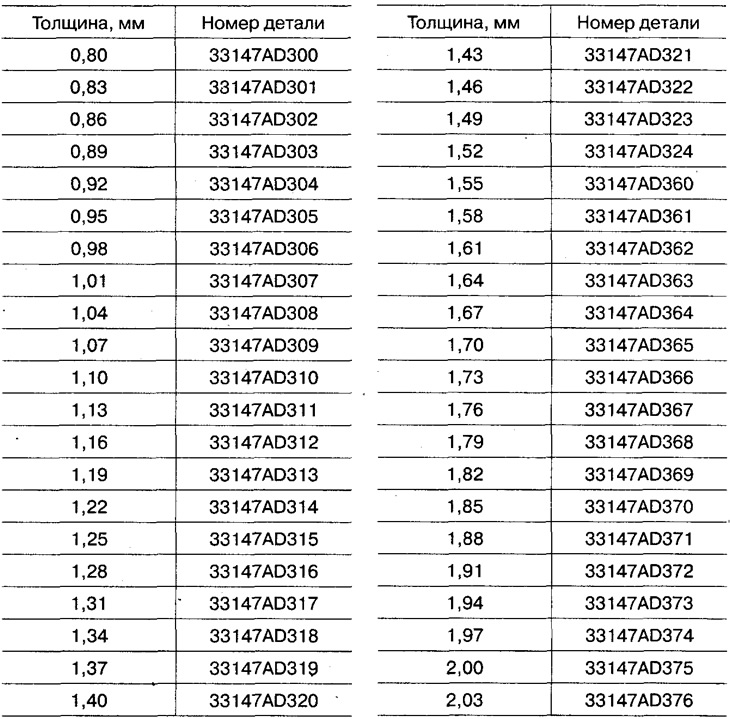
5. Pick up an adjusting washer.
Attention:
Only one shim is allowed.
If a shim of the correct thickness is not available, install the thicker shim closest to the design thickness.

Ring gear bearing shim on adapter housing side
1. Measure dimensions F, H, J, K, U, and V as shown.
2. Adjust dimensions F, H, J, K, U, and V to the following values.
- F: 163.00 mm (with an accuracy of 0.01 mm)
- H: 83.00 mm (with an accuracy of 0.01 mm)
- J: 109.50mm (with an accuracy of 0.01 mm)
- K: 14.40 mm (with an accuracy of 0.01 mm)
- U: 89.50 mm (with an accuracy of 0.01 mm)
- V: 17.00mm (with an accuracy of 0.01 mm)
3. Check the Z dimension, which is marked on the side of the drive gear.
Note: The Z dimension is the difference between optimal and standard engagement with an accuracy of 0.01mm.
4. Calculate the required thickness of the ring gear bearing shim T2 on the side of the adapter body using the formula below.
- T2= (K+F-H-Z+U-J-V) x 0.01 +1.49
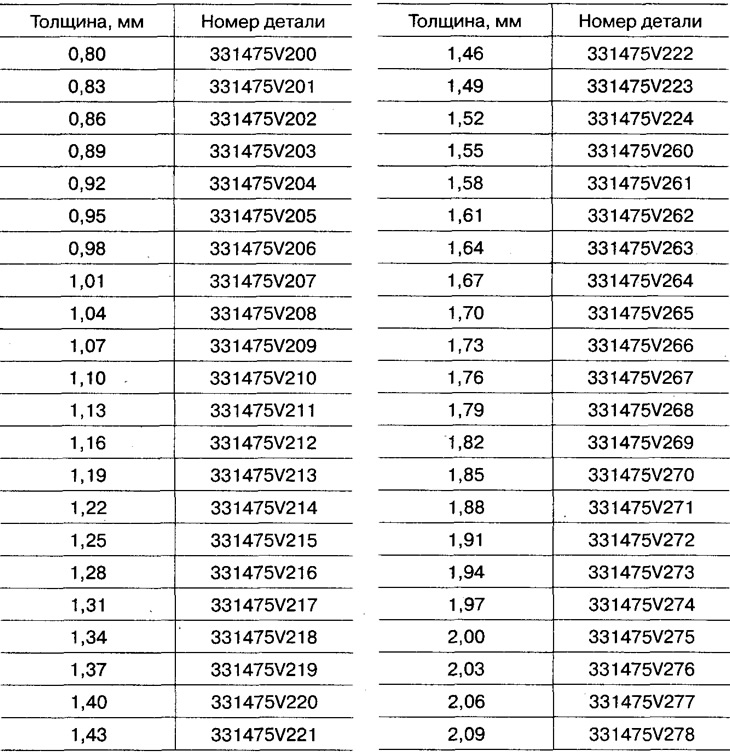
5. Pick up an adjusting washer.
Attention:
Only one shim is allowed.
If a shim of the correct thickness is not available, install a thicker shim closest to the rated thickness.

Adjusting lining of the coupling of a leading gear wheel
1. Measure the distances L, N and Q as shown in the figure.
2. Check the dimension S, which is on the end of the pinion.
Note: The S dimension is the difference between optimal and standard engagement with an accuracy of 0.01mm.
3. Calculate the required thickness of the TK shim using the formula below.
- T3= (74,6+S) +N+Q-L
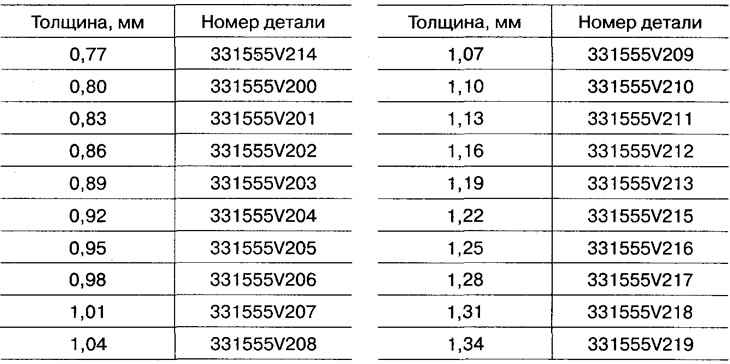
4. Select the thickness of the shim.
Only one shim is allowed.
