Use a scraper to remove the old sealant from the contact surfaces of the upper part of the oil pan and cylinder block, as well as from the bolt holes and threads.
Attention. Be careful not to scratch or damage the contact surfaces when removing the old sealant.
Install the O-ring to the cylinder block.
Apply a continuous bead of sealant with a special gun (WITH), as it shown on the picture.
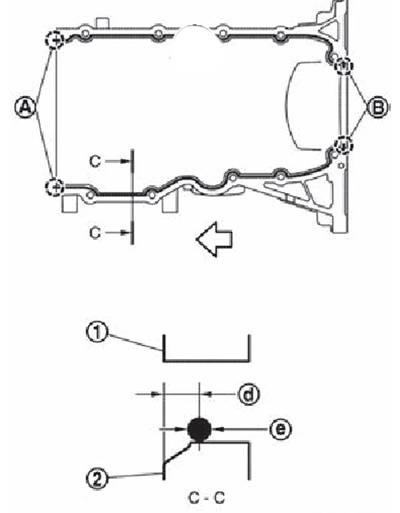
A: 2 mm outward protrusion.
B: 2mm protrusion from rear oil seal installation side.
d: 5.5-7.5mm
e: 4.0-5.0mm
Note.
- The white arrow points to the front of the engine.
- The black arrow points to the outside of the engine.
Attention. Installation must be completed within five minutes of sealant application.
Tighten the bolts in the sequence shown in the figure.
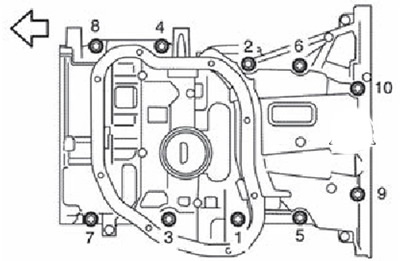
Depending on the installation location, the bolts have different lengths:
M8x180 mm: No. 9, 10.
M8 x 25 mm: Ns No. 3, 4, 7, 8.
M8 x 90mm: Nos. 1, 2, 5, 6.
Note. The arrow points to the front of the engine.
Attention. Ensure that the gaskets and O-rings remain in place and do not move during installation.
2. Install the crankshaft rear oil seal:
Attention.
- The installation of the rear oil seal must be completed within five minutes of installing the upper part of the oil pan.
- Always replace the engine rear oil seal with a new one.
- Do not touch the seal lips.
Use a scraper to remove the protruding sealant from the rear oil seal mounting surfaces on the top of the oil pan and cylinder block.
Apply a thin layer of sealant around the outer circumference of the new oil seal.
Note. Use genuine Nissan sealant or equivalent.
Press in the rear oil seal using a suitable drift (A) with an outer diameter of 113 mm and an inner diameter of 90 mm.
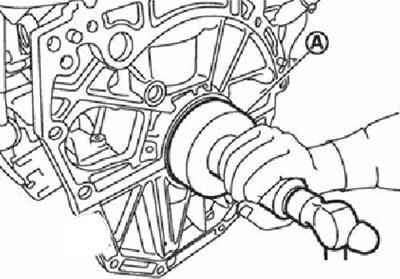
Note. Press the oil seal to the depth shown in the figure.
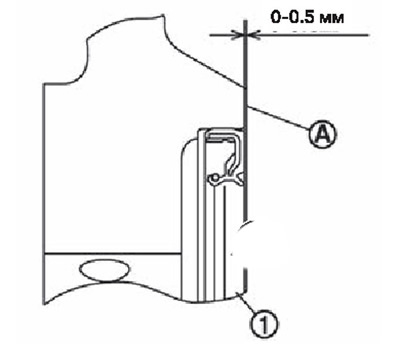
1. Rear oil seal.
A. The surface of the rear of the cylinder block.
Attention.
- Do not touch the grease applied to the lip of the seal.
- Be careful not to damage the rear oil seal mounting surfaces on top of the oil pan and cylinder block or crankshaft.
- Pressing should be carried out strictly perpendicular to the surfaces of the cylinder block and the oil pan, avoiding distortion or bending of the stuffing box.
After pressing in the rear oil seal, completely remove the protruding excess sealant from the rear surfaces of the engine.
3. Install the lower part of the oil pan:
scraper (A) remove the old sealant from the contact surfaces of the lower and upper parts of the oil pan, as well as from the bolt holes and threads.
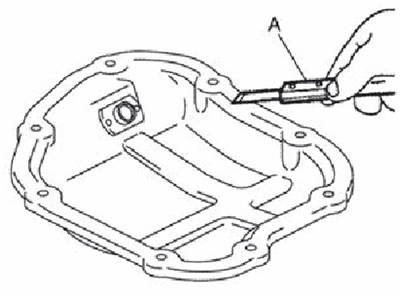
Attention. Be careful not to scratch or damage the contact surfaces when removing the old sealant.
Apply a continuous bead of sealant with a special gun (A), as it shown on the picture.
Note. Use genuine Nissan sealant or equivalent.
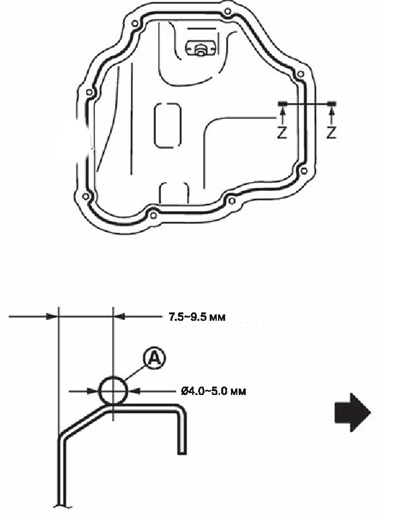
1. The bottom of the oil pan.
Note. The deal specifies the front of the engine.
Attention. Installation must be completed within five minutes of applying the sealant.
Tighten the mounting bolts in the sequence shown in the figure.
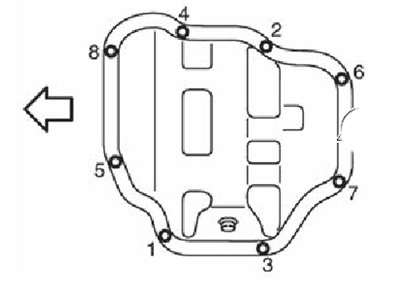
Note. The arrow points to the front of the engine.
4. Install the oil pan drain plug, observing the direction of installation of the seal (see general view drawing).
5. Further installation is carried out in the reverse order of removal.
Note. Wait at least 30 minutes after installing the oil pan before adding engine oil to the engine.