Removing
1. Disconnect the negative cable from the battery.
2. Remove the air cleaner and disconnect the fuel hoses.
3. Empty the cooling system and disconnect the upper radiator hose from the thermostat cover.
4. Disconnect the vacuum hoses of the brake booster and clutch servo (if one is included) from the intake pipe.
5. Disconnect the lower heating hose from the bulkhead of the engine compartment and from the front cover pipe under the pipeline.
6. On models equipped with an air conditioner, disconnect the vacuum hoses from the throttle damper and intake manifold.
7. Tag and disconnect the charcoal canister hoses from the tubes at the front of the engine. Release the upper radiator hose from the canister tube bracket.
8. Loosen the throttle cable mounting nuts on your bracket, turn the lever to move the throttle to the fully open position and remove the end of the cable from the holder. Move the cable to the side, laying it in such a way that it does not interfere with further work.
9. Disconnect the carburetor electrical connector.
10. Loosen the mounting nut of the dipstick guide tube bracket and remove the probe tube from the bracket.
11. Gradually loosen the fasteners of the inlet pipeline, moving in a spiral from the outer ends of the pipeline to the middle.
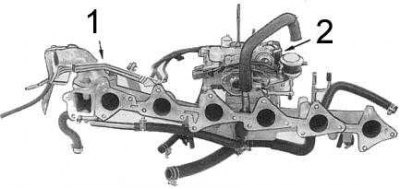
12. Carefully remove the intake manifold (see accompanying illustration), being careful not to allow dirt to enter the engine. Throw away the old gasket.

1 - tubes
2 - carburetor
Installation
Installation is in the reverse order.
1. Thoroughly clean all mating gasket surfaces first and inspect them for signs of flatness. If necessary, make a groove in the pipeline, or replace it.
2. Be sure to use a new gasket when assembling.
3. In several stages, tighten the fasteners of the inlet pipeline with the required force. Start from the center and spiral outward.
4. Connect all components that were disconnected during the dismantling process.
5. Fill the radiator with coolant.
6. Start the engine and check for vacuum losses and fuel and oil leaks.
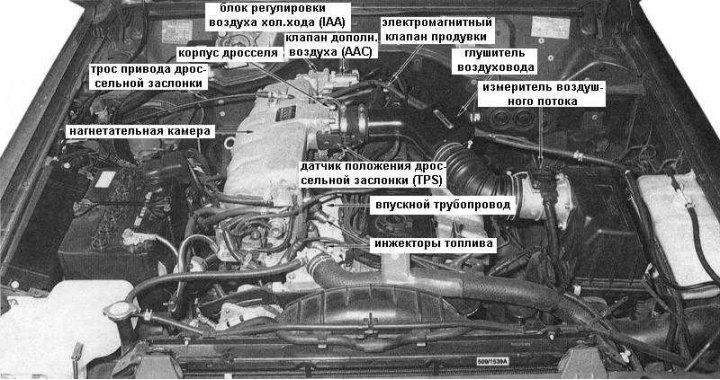
Late Years 4.2L Models Equipped with Fuel Injection (EFI)
Note. The assembly of the intake pipeline on these engines consists of two parts - the discharge chamber and the intake pipeline itself. For simplicity, both parts are hereinafter referred to as the inlet pipeline.

1. Relieve the pressure in the supply system (see Section Removal and installation of the engine 4.2L EFI).
2. Disconnect the negative cable from the battery.
3. Disconnect the vacuum hoses of the brake booster and clutch servo (if one is included) from the intake pipe.
4. Drain the liquid from the cooling system, lowering its level below the level of the cylinder head.
5. Loosen the clamps and disconnect the upper radiator hose and vent hose from the thermostat cover. Disconnect the bypass hose from the front of the piping under the thermostat cover.
6. Mark and disconnect the fuel supply hose from the fuel line tube, as well as the fuel return line from the fuel pressure regulator.
7. Loosen the hose clamps on the air duct sleeve complete with muffler on the throttle body and air flow meter.
8. Move the throttle actuator and disconnect the cable core. Give a bolt and remove a sleeve from the car. Loosen the throttle cable adjusting nuts and release the cable from the bracket.
9. Disconnect the following hoses:
- PCV hose - from the front of the intake manifold;
- charcoal canister purge hose - from throttle body and rear intake manifold (to ensure correct connection during assembly, do not forget to mark the hoses);
- The air regulator inlet hose is from a tube mounted in the back of the cylinder head cover.
10. Give bolts of fastening of hose tubes to a wall of the inlet pipeline. Disconnect the heating hoses from the inlet pipeline, remembering the order of their connection.
11. Disconnect three electric sockets located on an arm in a forward part of the inlet pipeline. Disconnect the wiring from the charcoal canister purge solenoid valve at the rear of the cylinder head cover and from the temperature sensor block at the front of the cylinder head.
12. Give bolts of fastening of the inlet pipeline to a head of cylinders and remove the pipeline from the car.
13. If necessary, the inlet pipeline itself can be separated from the discharge chamber after the fixing bolts have been loosened.
Installation
Install in the reverse order, taking into account the following points:
1. Thoroughly clean all mating surfaces first and check them for signs of flatness or other defects. If necessary, make a groove in the inlet pipeline, or replace it.
2. Use only new gaskets when installing.
3. Fasteners of the inlet pipeline tighten with the required effort in several stages, moving in a spiral from the center outward.
4. Make sure all electrical and hose connectors are securely connected.
5. Refuel the radiator as described in Chapter Refrigeration, heating and air conditioning systems for 4.2L EFI models.
6. Finally, start the engine and check it for signs of loss of vacuum, as well as fuel and water leaks.