Models Hardtop (Hardtop) and Universal (Station Wagon)
Removing
1. Loosen rear wheel nuts.
2. Jack up the rear of the vehicle and place it on jack stands placed under the frame members. Remove rear wheels.
3. Remove the drain plug and drain the oil from the rear axle housing.
4. Mark the position of the rear driveshaft relative to the pinion flange and parking brake drum. Disconnect the propeller shaft and remove it from under the vehicle.
5. Release the clamp and disconnect the ventilation hose from the rear axle housing.
6. Disconnect a brake tube from a flexible brake hose, release a fixing clip and release a hose from a basic arm. Seal the open ends of the tube and hose to prevent dirt from entering the hydraulic brake system.
7. Disconnect the valve spring - pressure regulator from the bracket on the rear axle housing.
8. Using two stands or jacks, support the bridge in a horizontal position.
9. Give the fixing nuts, remove the washers and disconnect the lower shock absorber supports from the rear axle housing.
10. Give the nut, remove the washer, then, prying with a lever, separate the transverse jet rod from the axle housing.
11. Give nuts and disconnect racks of the stabilizer of cross stability from its bar.
12. Give nuts and bolts of fastening of the top and bottom longitudinal jet suspension rods to the axle housing.
13. Lower the axle assembly and remove the coil springs and their rubber seats. Note the spring settings.
14. With the help of an assistant, remove the bridge from under the car.
Installation
Installation is in the reverse order.
1. Move the rear axle assembly into position, then insert the lower torque rod mounting bolts, but do not tighten the nuts at this stage.
2. Replace the helical springs with seats. Make sure the components are placed correctly. Support the bridge with a jack.
3. Install the upper longitudinal torque rods, transverse torque rod and shock absorbers, but do not tighten the mounting nuts at this stage.
4. Connect the anti-roll bar to the uprights, tighten the fixing nuts with a force of 32÷38 Nm.
5. Install the cardan shaft (sliding joint forward). Follow the correct alignment of the landing marks applied during the dismantling process. Tighten the fixing nuts and bolts with a force of 93÷108 Nm.
6. Connect the ventilation hose and brake pipe, bleed the hydraulic system.
7. Pour the required amount of oil of the required grade into the axle housing.
8. Lower vehicle to ground and tighten to specification (see tables of sizes and adjustments at the end of the guide) by the force of the nuts for fastening the longitudinal jet rods, shock absorbers and the transverse jet rod.
Utility Models (Van) and mini truck (Cab Chassis)
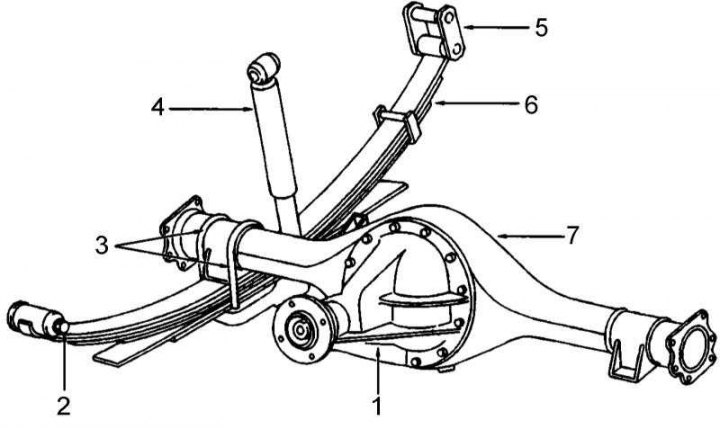
Rear Axle Assembly Components Utility Models (Van) and Mini Truck

1 - assembly of the main gear; 2 - anchor pin; 3 - stepladder; 4 - shock absorber; 5 - earring; 6 - spring; 7 - axle housing
Removing
1. Loosen rear wheel nuts.
2. Jack up the rear of the vehicle and place it on jack stands placed under the frame members. Remove rear wheels.
3. Remove the drain plug and drain the oil from the rear axle housing.
4. Mark the position of the rear driveshaft relative to the pinion flange and parking brake drum. Disconnect the propeller shaft and remove it from under the vehicle.
5. Release the clamp and disconnect the ventilation hose from the rear axle housing.
6. Disconnect a brake tube from a flexible brake hose, release a fixing clip and release a hose from a basic arm. Seal the open ends of the tube and hose to prevent dirt from entering the hydraulic brake system.
7. Give fixing nuts, remove washers and disconnect the bottom support of shock-absorbers from basic plates of springs.
8. Give nuts of U-shaped bolts and remove basic plates of step-ladders of springs.
9. Support the axle housing horizontally with two stands or jacks.
10. Give nuts and disconnect racks from a bar of the stabilizer of cross stability.
11. Give fixing nuts and, supporting springs, take plates of earrings and fingers from their back ends and chassis brackets. Lower the rear ends of the springs to the ground.
12. With the help of an assistant, remove the axle assembly from under the vehicle.
Installation
Installation is in the reverse order.
1. Track the correct placement of the axle housing on the central bolts of the springs.
2. Install the pins, bushings and spring shackle plates, but do not tighten the mounting nuts at this stage.
3. Install the U-bolts and support plates of the spring ladders, tighten the fixing nuts with a force of 108÷147 Nm.
4. Install the cardan shaft (sliding joint forward). Follow the correct alignment of the landing marks applied during the dismantling process. Tighten the fixing nuts and bolts with a force of 93÷108 Nm.
5. Connect the vent hose and brake pipe, bleed the hydraulic system.
6. Pour the required amount of oil of the required grade into the axle housing.
7. Lower vehicle to ground and tighten to specification (see tables of sizes and adjustments at the end of the guide) by the force of the nut for fastening the fingers of the springs and shock absorbers.