Removing
1. Jack up the front of the car and place it on jack stands under the front axle housing.
2. On models without ball joints in the stabilizer bar struts, loosen the nuts securing the strut struts to the chassis brackets and remove the washers, rubber bushings, spacers, and strut bolts.
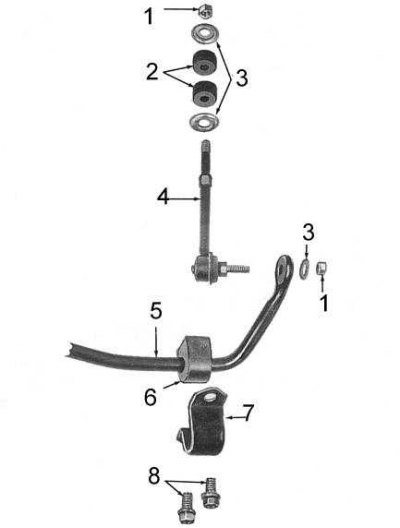
3. On models with ball joints in the boom legs, loosen the nuts securing the legs to the chassis brackets and remove the washers and rubber bushings (with the required force). Give nuts of spherical hinges of racks and remove racks from the car (see accompanying illustration).

1 - nut; 2 - rubber bushings; 3 - washers; 4 - stabilizer bar; 5 - stabilizer bar; 6 - rubber cushion; 7 - bracket; 8 - bolts
4. Give bolts of fastening of basic arms of a bar of the stabilizer of cross stability to a crankcase of the forward bridge. Remove the brackets from the car.
5. Remove the stabilizer bar from under the vehicle.
Installation
Installation is in the reverse order.
1. Check up a condition and track correctness of landing of rubber pillows in arms. Tighten the fixing bolts with a force of 25÷32 Nm. When the bolts are correctly tightened, the paint markings on the stabilizer bar should protrude evenly on both sides.
2. Check up a condition of rubber plugs and, at the corresponding complete set, spherical hinges of racks of the stabilizer of cross-section stability, trace correct landing of components. Tighten the top nuts with a force of 20÷23 Nm.
3. On models with ball joints in the uprights, tighten the nuts on the joints to 20÷23 Nm.